It is possible to configure OnePlace Solutions to prevent displaying Document Set stubs in the navigation tree which is used in OnePlaceMail Save, Open, Insert windows.
What are Document Set stubs?
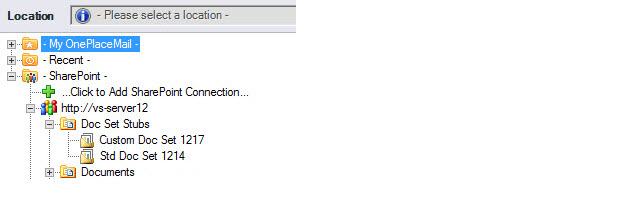
Document Set stubs are
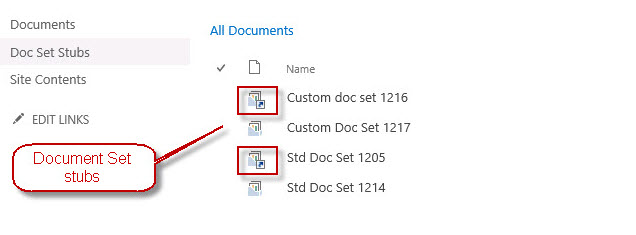
Document Sets that have been moved to a Records Centre and link left in the
document library. The following image shows a document library containing four
Documents Sets, where two Document Sets have been moved to the Records Centre
and a link (Document Set stub) left in the library.
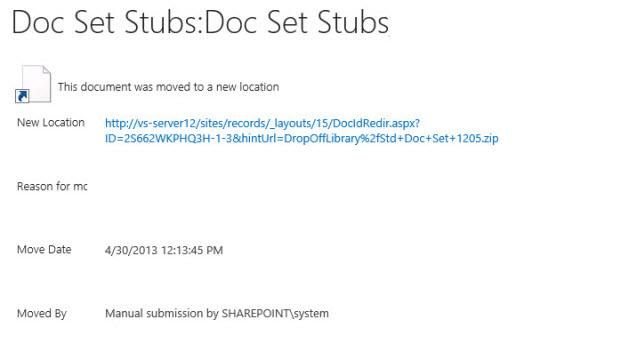
When opening a Document Set stub in SharePoint, instead of directly opening the Document Set and viewing the contents as you would expect, you are presented with the following page in SharePoint letting you know that the Document Set has been moved and provides a link across to the Records Centre.
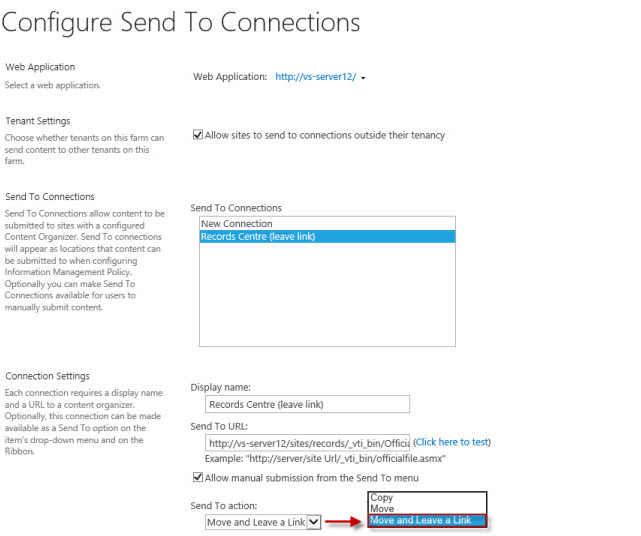
The behavior for what happens when Document Sets are sent to the Records Centre is configured in the SharePoint Central Administration site (under General Settings | Configure Send To Connections). When configuring the Send To Connections there are three options for the Send To action:
Copy
Move
Move and Leave a Link
It is the third option (Move and
Leave a Link) that results in stubs being left behind in the library.
How to prevent OnePlaceMail from displaying Document Set stubs
The navigation tree used by OnePlace Solutions is flexible and can be set to show locations based on a view within that library. Further information can be found here:
How to filter the folder structure of a library/list in the navigation tree of OnePlaceMail
By using this feature of OnePlaceMail we can create a view in the library that just shows actual Document Sets and filters out the Document Set stubs. The filter we need to apply cannot be achieved directly through the SharePoint user interface and the remainder of this article describes how this can be accomplished via PowerShell.
Step 1 - Create the Content View
Create the view for OnePlaceMail to use in the navigation tree. If you use the view name "Content View", OnePlaceMail will automatically use the view without any configuration of the client. Normally just creating a new view from the All Documents view will suffice as OnePlaceMail will automatically filter out all document items and just present folders (Document Sets are a special type of folder)
Step 2 - Modify the view filter using PowerShell
Now we have created our Content View we can use the following PowerShell to set the view filter to remove just the Document Set stubs. This PowerShell script also shows how to optionally hide the view to prevent it from appearing in the SharePoint user interface, so users won't even know it exists.
The Content View in SharePoint should not just show Document Sets (not stubs)
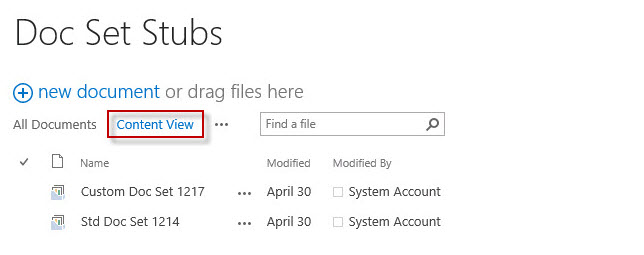
The content view will automatically display the folder structure based on this view, - excluding the document set stubs when navigating SharePoint.
# Configure the correct server, list and view
$webUrl = "http://vs-server12"
$listName = "Doc Set Stubs"
$viewName = "Content View"
$web = Get-SPWeb $webUrl
$list = $web.GetList($listName)
$view = $list.Views[$viewName]
$newQuery = '<OrderBy><FieldRef Name="FileLeafRef" /></OrderBy><Where><Neq><FieldRef Name="IconOverlay" /><Value Type="Text">SharePoint.DocumentSet||linkoverlay.gif</Value></Neq></Where>'
Write-Host "This will modify the query of the following view to NOT include document sets stubs (links) where the document set has been sent to the Records Centre and just a link remains."
Write-Host "View title: " $view.Title
Write-Host "View url: " $view.ServerRelativeUrl
Write-Host "Current view query: " $view.Query
Write-Host "New view query: " $newQuery
$view.Query = $newQuery
# Uncomment the following line to also hide the view so it will be found by OnePlaceMail but not visible through SHarePoint UI
#$view.Hidden = $true
$view.Update()

