Email Tracking Modern
Overview
Email Tracking enables productivity and collaboration to allow team members to know when and where an email has been saved to Microsoft 365.
These instructions will detail how to set up Email Tracking for OnePlaceMail in your Azure environment.
Azure Subscription
To enable the Email Tracking Service the tenant must have a valid Subscription Id available for registering access to the Email Tracking service in Azure Marketplace (Step 4).

If you do not have an Azure Subscription, you will need to set one up to run the Email Tracking service, which deploys a variety of Azure resources. Please contact [email protected] if you have further questions on this.
Install and Configure
Step 1: Create an Email Tracking App Registration in Azure Active Directory
In this step, we will set up the app registration for email tracking within your Microsoft 365 tenant.
For the email tracking solution to be able to process updates to email data in your users’ mailboxes, an app registration with relevant permissions is required within your Microsoft 365 tenancy to act as the identity that will apply the updates. The required permissions for the application are:
GroupMember.Read.All
This permission allows the application to identify possible group email addresses in an email’s recipient list and identify members of that group so that it can update the status of the email in each user’s mailbox.
User.Read.All
This permission allows the application to retrieve the email address attached to users contained within the abovementioned groups.
Mail.ReadWrite
This permission allows the application to update properties and categories on the email.
MailboxSettings.Read
This permission allows the application to read the categories present in the mailbox so that it can use them to update the status on each email.
Use PowerShell/Azure Command Line Interface to setup the App Registration
-
Prior to executing any scripts, please ensure that the Azure CLI is installed on your computer. How to install the Azure CLI | Microsoft Learn (direct link to install the Azure CLI - Windows client)
-
Download our script to create an app registration for email tracking in your Azure Active Directory tenant.
-
Run the script using PowerShell
a. Right click on the script and select Run in PowerShell

4. You will be prompted to provide a domain for your M365 tenant (e.g contoso.onmicrosoft.com)

5. You will be prompted to login to Azure under the provided tenant in a browser window. You will need to login as a user with sufficient privileges to create applications in Azure Active Directory. Please enter this name for the app registration: “OnePlaceMail Email Tracking”.
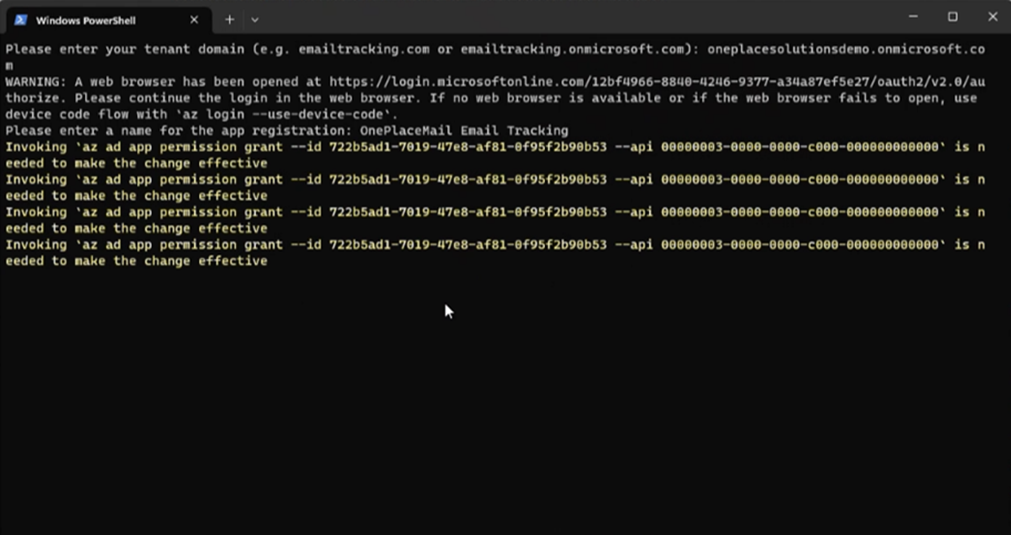
6. Please make sure you copy the ‘Application ID’ and ‘Client Secret’ of the created app registration to Notepad before closing your PowerShell window.

The app registration required for Email Tracking has now been created!
Step 2: Deploy the Email Tracking Azure Service (via Azure Marketplace)
OnePlaceMail Email Tracking requires a group of Azure resources to support running the application. In this step we will use Azure Marketplace to deploy these resources. To do so, please:
1. Open Azure.
2. Search for “Marketplace” > Click the Marketplace resource.

3. Search for “OnePlaceMail Email Tracking” in the marketplace.

![]()
4. Select the “OnePlaceMail Email Tracking” plan and click the “Create” button.

5. The default Azure Subscription will be pre-selected (you can change this to any available subscription you wish to use). The ‘Region’ may also be selected automatically for the resource instance – this needs to be the region that will best service your organization (closest proximity) - You should be able to leave it as is.
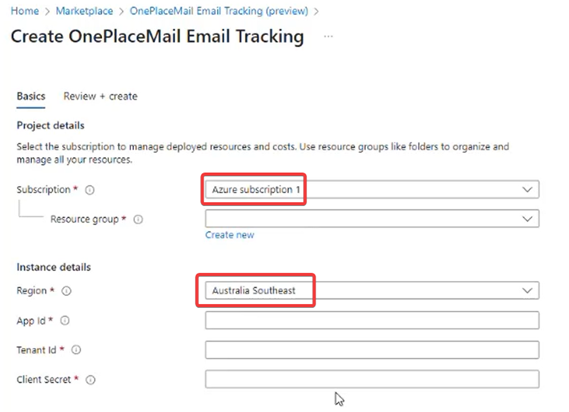
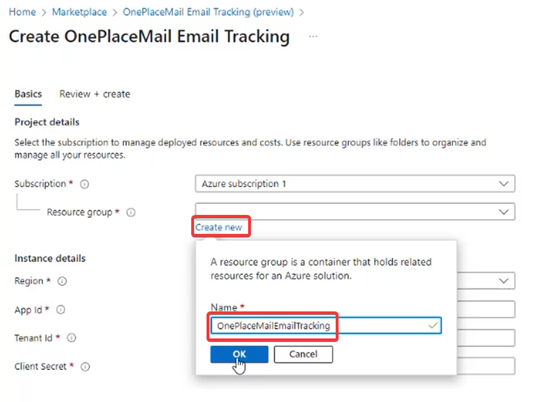
6. Create a new resource group. Click the “Create New” link and then enter a new name for the resource group. The name must be unique within the selected Azure subscription.
7. Then from the information collected when creating the app registration (these should have been copied to Notepad), copy the details into the relevant fields.
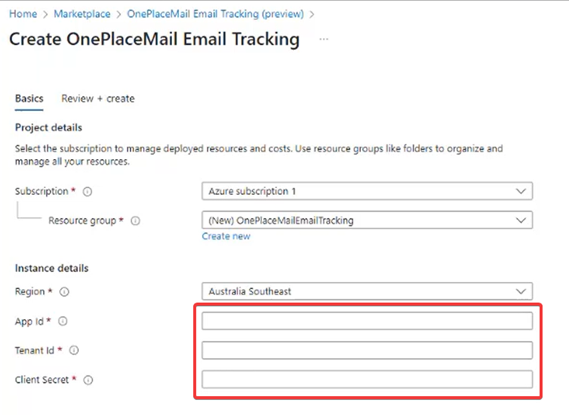
8. Click “Review + create”.
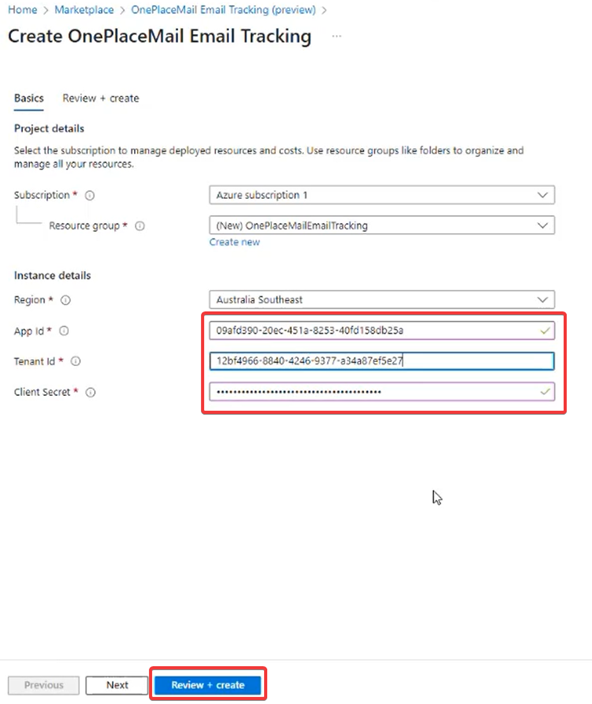
9. After ensuring that all details are correct, finalize the deployment of the Azure Resources by clicking “Create”.
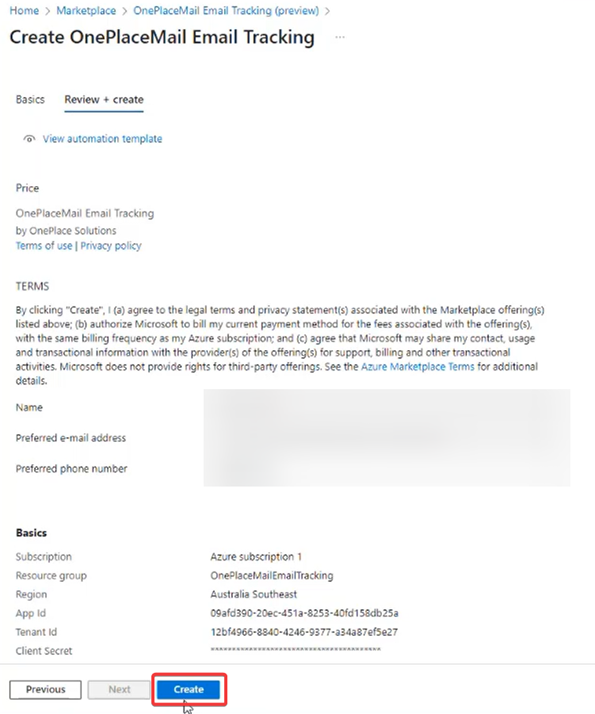
10. The resources will take a short while to deploy (approx. 5 minutes). Wait until you see the ‘✅Your Deployment is complete’ notification.

The Azure resources required for Email Tracking have now been created!
Step 3: Deploy code package to the Email Tracking Azure service
In the previous step, Azure resources were created to support running the application, but in its current state it has no code to process updates. In this step you will prime the Azure Function resource with the application code. To do so, please:
1. Prior to executing any scripts, please ensure that the Azure CLI is installed on your computer. How to install the Azure CLI | Microsoft Learn.
2. Download the code for the Email Tracking application.
3. Navigate to your Azure Function resource that was created with the Azure Marketplace offer by searching for “Function App” in Azure. Select the Function App resource type.
![]()
4. Find the correct Azure function for Email Tracking from the deployment and click on the row to open the Azure resource instance.
![]()
5. Gather the details required for pushing the code to the resource. You will need to copy the values for the Resource Group name, Subscription ID, and Function App name.
![]()
^The ‘URL’ (the Email Tracking Azure Service base address) is also required for a later step to point OnePlaceMail clients to the service. Please copy this to a Notepad as well for when it is needed.
6. Download or copy the script to deploy code to the Function App.
7. Run the script using PowerShell. It is suggested that you run the script from the same folder location as that which you downloaded the code for the Email Tracking application to minimize the requirements around providing a name for the code package.
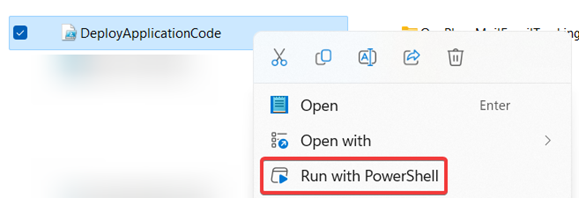
8. You will be prompted to provide a domain for your M365 tenant (e.g contoso.onmicrosoft.com)
![]()
9. You will be prompted to login to Azure under the provided tenant in a browser window.
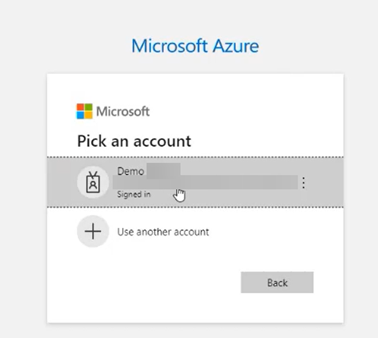
10. Go back to the PowerShell window. You will be prompted to enter the details you have collected in step 5.
![]()
11. Enter the name of the Email Tracking code package (that was download in step 2) when prompted (Example: 'OnePlaceMailEmailTracking-20240612.1.zip'):
![]()
12. When the deployment is complete you will be updated.
![]()
13. OnePlaceMail Email Tracking manages updates to the application using Function App deployment slots. Deployment slots allow you to push new versions of the application to a “staging” slot that mirrors the production environment. This will allow you to conduct tests on the new version of the application without affecting production traffic (should you deem it necessary).
For first time deployment however, you will need simply swap the slots so that the application version lands in the production slot. To do so, go to the Function App instance (detailed in steps 3 & 4 earlier), click on the “Deployment slots” tab, and then click the “Swap” button.
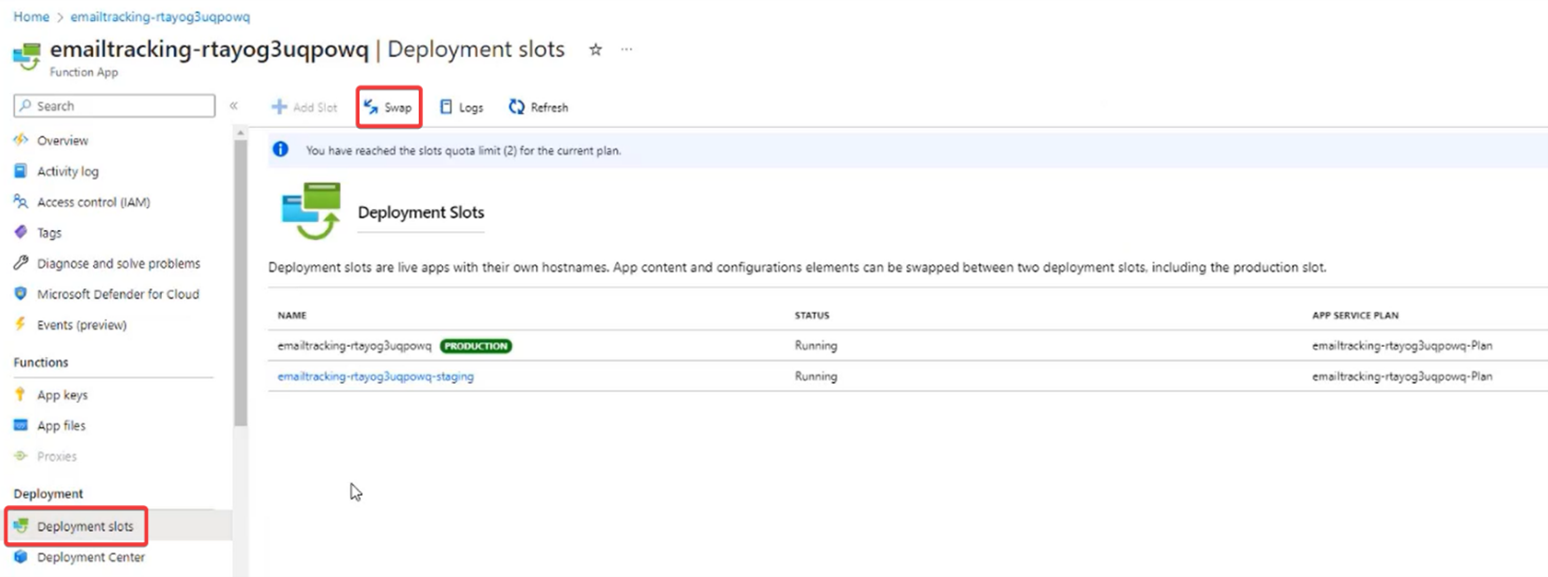
14. Proceed to complete the swap by clicking the “Swap” button on the pop-out window. (You may need to wait 1-2 minutes for the swap process to complete).

The code for email tracking has now been deployed to Azure!
Step 4: Configure OnePlace Solutions clients to use the Email Tracking Azure service
In this step you will use OnePlace Solutions Administration Client to apply the relevant configuration for sending requests to your service. This step assumes that you have the Administration Client installed and have previously provisioned a OnePlace Solutions administration SharePoint site, and have knowledge of using profiles to apply settings to groups of users.
Now that all the resources required for the service have been deployed and provisioned, we need to apply user configurations to OnePlace Solutions software so that requests can be made to your unique service URL. To do so, please:
1. Locate and copy the ‘URL’ that we asked you to retrieve earlier in Step 3 / from the Email Tracking Azure Function resource that has been created:
If you need to locate the URL again:
a) Navigate to your Azure Function resource that was created with the Azure Marketplace offer by searching for “Function App” in Azure. Select the Function App resource type.

b) Find the correct Azure function from the deployment and click on the row to open the Azure resource instance.

c) Copy the “URL” value from the “Overview” tab of the Function App.
![]()
Configure your OnePlaceMail clients for Email Tracking via Configuration Profile:
2. Open the ‘OnePlace Solutions Administration Client’ and select the “Central Configuration” tab.
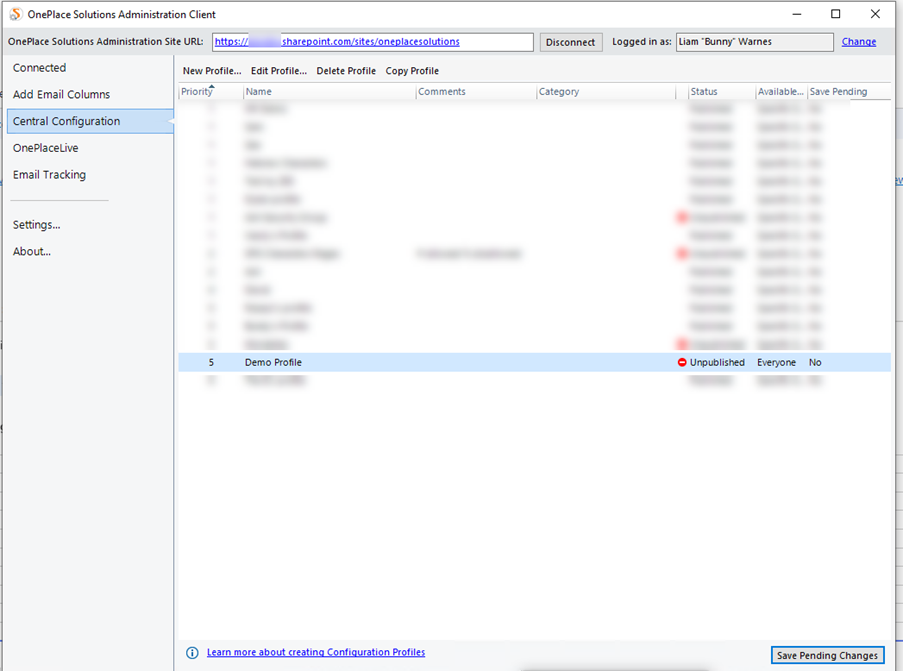
3. Open the profile for customizing configurations. Search for the item “Email Tracking Service configuration”. Double click on the row in the grid to open the configuration.
![]()
4. Apply the URL value copied from the previous step to the field “Email Tracking Azure Service base address” and click the “OK” button. Save changes to the profile by clicking the “Save Pending Changes” button.

Congratulations! Your OnePlaceMail clients are now configured to integrate with your OnePlaceMail Email Tracking service!
The client secret generated during Step 1 when creating the App Registration for Email Tracking will expire after 2 years and will need to be updated in the Email Tracking service. This can be done by creating a new client secret (2 year limit is the max that can be set) via the 'OnePlaceMail Email Tracking' App Registration > Certificates & Secrets > New client secret. Copy the new client secret to Notepad.
![]()
![]()
After copying the new client secret created to Notepad, you will need to navigate to the ‘Function App’ area in your Azure > click on your Email Tracking Function App > go to Settings > Environmental variables > search for ‘ClientSecret’ > then you can click on the ‘EmailTrackingClientSecret’ and update the value with the new client secret that you’ve copied to Notepad > click ‘Apply’.
![]()
Video
Please find a short video guide on implementing Email Tracking
