
Configure an Impersonation Account to User Mailboxes
Create a user account to use specifically for the purpose of using for the Email Tracking service. This account will need to be given Application Impersonation permission on all OnePlaceMail user mailboxes. Either make this account with a password that doesn’t expire, or ensure you have procedures in place to ensure passwords are updated so that an expired password scenario is not encountered.
Option 1: Grant Access to Impersonate All Users
Use the following procedure to give the service account permission to impersonate any user. The same procedure applies to Exchange on-premises and Exchange Online (Office 365)
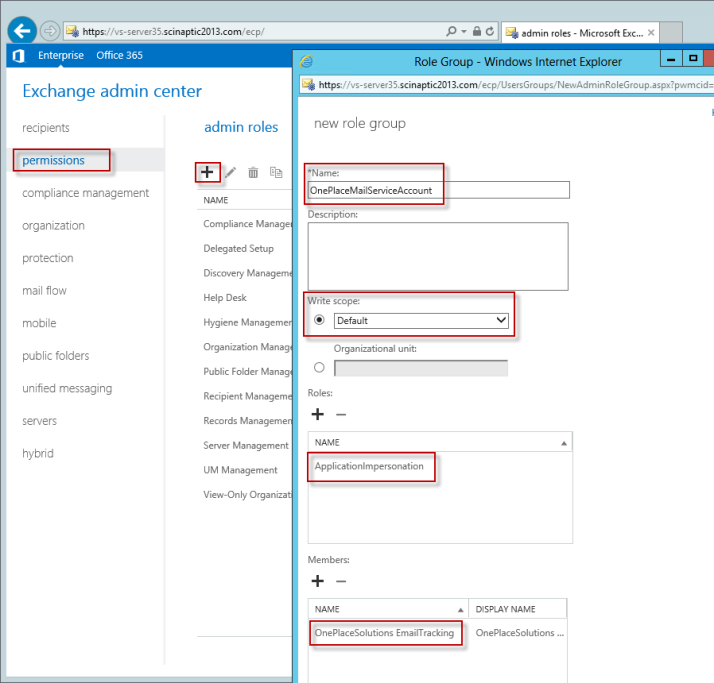
- Open the Exchange Admin Center (this is available from the Admin application in Office 365 as shown below)

- Select Permissions | Add
Please take note of these considerations
- Write Scope: Select Default. This determines which mailboxes the permission applies to, Default includes all mailboxes within the scope.
-
Roles – Select ApplicationImpersonation. This is the type of permission to grant to mailboxes within the write scope.
- Members – Specify the name of your service account (OnePlaceSolutions EmailTracking) that is going to be connecting to all the mailboxes and performing the updates. Effectively we are granting this user the ability to impersonate within mailboxes within the write scope.
Option 2: Grant Access to Impersonate Limited Users
Granting impersonation access to a limited set of Exchange users is more complex than granting access to all users. In Exchange this requires the creation of a Management Scope which identifies the users that the impersonation will apply to.
The remainder of this section details how to create a Management Scope that is bound to a Group. While this is conceptually an easier example to understand, it may not be suitable for your environment due to the following reasons:
-
Management scopes bound to a group does not support nested groups
-
Management scopes bound to a group use the full distinguished name of the group, in Office 365 Microsoft reserve the right to change the distinguished name of a group to support restructuring and you may have no control or warning over this.
-
A full explanation of Exchange Management Scopes is beyond the scope of this document and it is recommended that you familiarize yourself with the options available. The following MSDN article is a good starting point.
-
Understanding management role scope filters: https://technet.microsoft.com/en-us/library/dd298043(v=exchg.150).aspx
Create the Management Scope - Select either Online/365 or on-premise
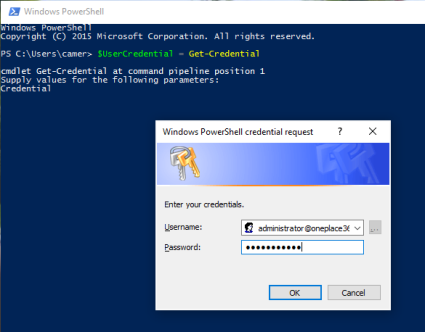
On your local computer, open Windows PowerShell and run the following command
PowerShell: $UserCredential = Get-Credential
- In the Windows PowerShell Credential Request dialog box, type your Exchange Online user name and password, and then click OK.
Run the following command:
$Session = New-PSSession -ConfigurationName Microsoft.Exchange -ConnectionUri https://outlook.office365.com/powershell-liveid/ -Credential $UserCredential -Authentication Basic –AllowRedirection

Import-PSSession $Session

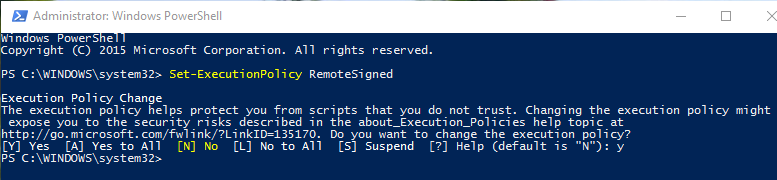
If the Import-PSSession fails with this error message:

-
Close the current PowerShell window, and open a new PowerShell window and choose to run as administrator
- Run: Set-ExecutionPolicy RemoteSigned
- Select 'Yes'
Now try this procedure (from the beginning of Step 2 – Create the Management Scope) again.
Next we need to get the distinguished name of the group we are going to use (this is the distribution group we just created). The easiest way to do this is to get a handle on the group object and then read out the distinguished name
$Group = Get-Group "OnePlaceSolutionsEmailTrackingUsers"

Now get the distinguished name of the group as we will need it for the next command
$Group.DistinguishedName

In the example above, the distinguished group name for the below command is:
CN=OnePlaceSolutionsEmailTracker,OU=oneplacetest.onmicrosoft.com,OU=Microsoft Exchange Hosted Organizations, DC=PRO1A003, DC=POD, DC=OUTLOOK, DC=COM
New-ManagementScope –Name "OnePlaceMailServiceAccount" –RecipientRestrictionFilter {MemberofGroup -eq "your-distinguished-group-value-here"}

You may get an error indicating you cannot run this command and you need to run Enable-OrganizationCustomization first.
Here's an article describing what this means
If this is the case, you just need to run the stated command:
Enable-OrganizationCustomization

Then trying to create the Management Scope should work

Now that we have the new Management Scope defined I like to test it by running the following command which will list out all the users that are included in this Management Scope. This should be the users that you have added to the distribution group.
$myMS = (Get-ManagementScope | Where-Object Name -eq "OnePlaceMailServiceAccount")
Get-Recipient -RecipientPreviewFilter $myMS.RecipientFilter

Be sure to disconnect the remote PowerShell session when you're finished. If you close the Windows PowerShell window without disconnecting the session, you could use up all the remote PowerShell sessions available to you, and you'll need to wait for the sessions to expire.
To disconnect the remote PowerShell session, run the following command:
Remove-PSSession $Session
Launch the Exchange Management Shell.
First we need to get the distinguished name of the group we are going to use (this is the distribution group we just created). The easiest way to do this is to get a handle on the group object and then read out the distinguished name.
$Group = Get-Group "OnePlaceSolutionsEmailTrackingUsers"
$Group.DistinguishedName

Use the following command to create the new management scope now that you have the distinguished name of the group.
New-ManagementScope –Name "OnePlaceMailServiceAccount" –RecipientRestrictionFilter {MemberofGroup -eq "your-distinguished-group-value-here"}

Now that we have the new Management Scope defined I like to test it by running the following command which will list out all the users that are included in this Management Scope. This should be the users that you have added to the distribution group.
$myMS = (Get-ManagementScope | Where-Object Name -eq "OnePlaceMailServiceAccount")
Get-Recipient -RecipientPreviewFilter $myMS.RecipientFilter
Return to the Exchange Admin Center
Select Permissions | Admin Roles | Add New Role Group
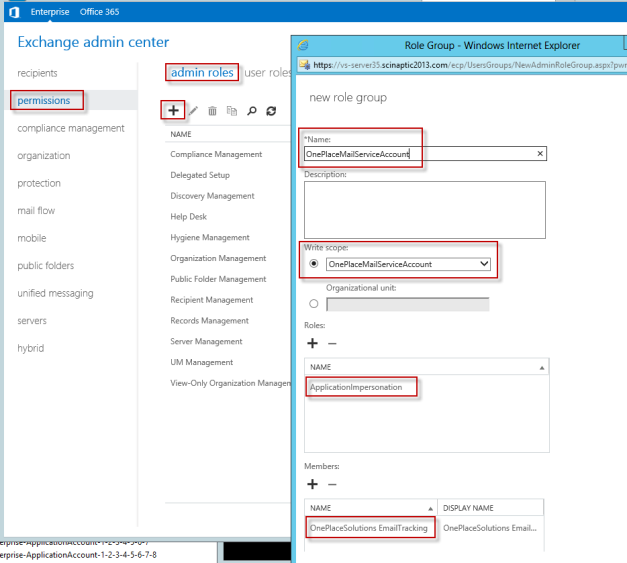
The important information on the New Role Group dialog are:
- Write Scope – Select the new Management Scope (OnePlaceMailServiceAccount) we created. This determines which mailboxes the permission applies to.
- Roles – Select ApplicationImpersonation. This is the type of permission to grant to mailboxes within the write scope.
- Members – Specify the name of your service account (OnePlaceSolutions EmailTracking) that is going to be connecting to all the mailboxes and performing the updates. Effectively we are granting this user the ability to impersonate within mailboxes within the write scope.

|
Next Step: Configure Email tracking software |